
Key facts
Start here
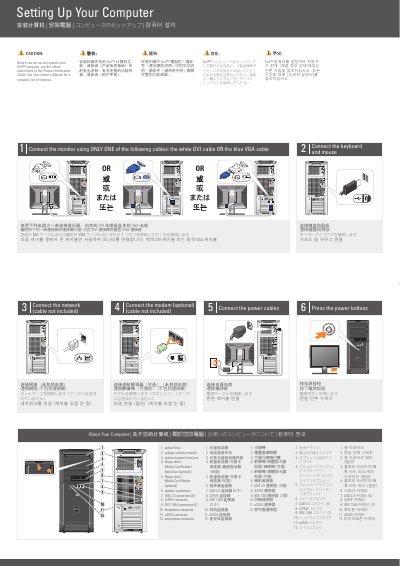
Dell XPS 420 Computer Setup Guide
This two-page guide explains how to set up a Dell XPS 420 computer: connect the monitor with either a DVI or VGA cable, connect the keyboard and mouse, connect the network and optional modem, connect the power cables, and press the power buttons. It also identifies the computer's drives and connectors and shows an optional wireless network arrangement.
The guide refers readers to the Owner's Manual and Product Information Guide for more information and includes copyright and trademark notices for Dell Inc.
Dell XPS 420 specifications
| Supported processors | Intel® Core™ 2 Duo, Intel® Core™ 2 Extreme, Intel® Core™ 2 Quad |
|---|---|
| Maximum memory | 8 GB |
| Memory type | DDR2, dual‑channel, 667 MHz / 800 MHz |
| Chipset | Intel® X38 Express / ICH9R |
| Power supply | 375 W or 425 W |
| Network interface | Integrated Gigabit Ethernet (10/100/1000) |
Source: Dell XPS 420 User Manual
All Dell XPS 420 documents by type
Day-to-day operation, settings and troubleshooting. Start here if the product is already set up.
The shortest path to a working setup, usually only a few pages.
Mounting, wiring and first power-up. Read it before the hardware goes in.
Questions answered in these manuals
How do I enter the System Setup Utility (BIOS)?
Turn on the computer and press <F2> as soon as the Dell logo appears.
From: Dell XPS 420 User Manual
Which video cables can be used to connect the monitor?
You must use only one of the white DVI cable or the blue VGA cable.
What is the maximum number of USB 2.0 connectors available?
The computer has eight USB 2.0 connectors.
How do I enter the System Configuration?
Press the <F2> key immediately when the DELL logo appears on the screen.
What is the maximum memory supported?
The system supports a maximum of 8 GB of memory.
Which cable can be used to connect the monitor?
Use only one of the white DVI cable or the blue VGA cable.