
Quick Setup Guide for the JVC BR-EN900 encoder, covering IP configuration, channel setup, and streaming protocol options.
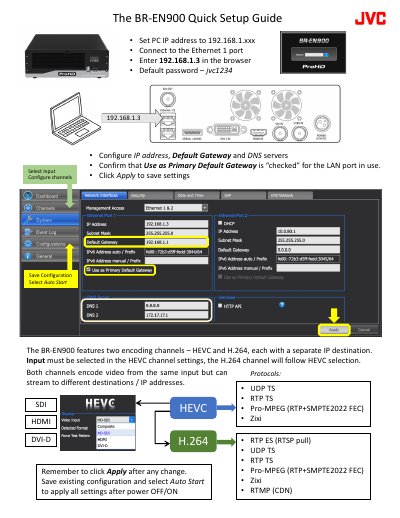
The guide walks you through the initial configuration of the BR-EN900 encoder. It shows how to set a PC IP address, connect to Ethernet port 1, access the web interface at 192.168.1.3, and configure the IP address, default gateway, DNS servers, and primary gateway settings. After making changes, click Apply and optionally enable Auto Start for power‑on operation.
It also explains the encoder’s two independent channels (HEVC and H.264), the supported input types (SDI, HDMI, DVI‑D) and streaming protocols (UDP TS, RTP TS, Pro‑MPEG, Zixi, RTMP, etc.). Details on latency, error‑correction settings, and UDP packet‑size considerations for reliable WAN streaming are included.
| Encoding channels | Two (HEVC and H.264) |
|---|---|
| Separate IP destination per channel | Yes |
| Supported input interfaces | SDI, HDMI, DVI‑D |
| Auto‑Start | Enabled via configuration |
Save the current configuration and enable the Auto Start option; the encoder will begin encoding when power is applied.