
Toshiba application note on setting the AS3 digital input terminal S1 function from the monitor mode screen, with wiring and check steps.
This Toshiba application note (1.6.1, estimated time 10 minutes) explains how to set the terminal function of digital input S1 on an AS3 unit via the standard monitor level. It is a follow-up to AS3 Application Note 1.1.0 on navigating menus and parameters.
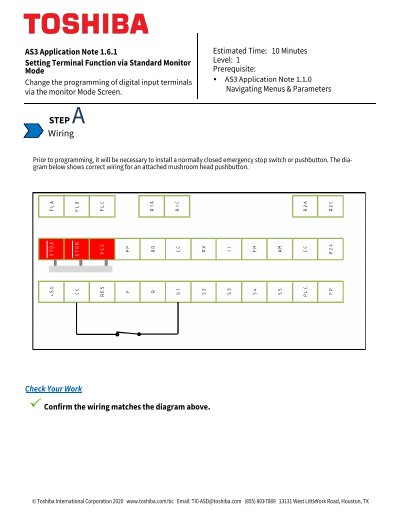
Step A covers wiring, showing the correct connection for an attached mushroom head pushbutton with a normally closed emergency stop switch. Step B walks through the keypad programming sequence (F4, OK and F2 keys, then F3 and OK) starting from the main operation screen, scrolling to S1 and selecting an assignable function such as preset speed switching. A final check confirms the setting by pressing the pushbutton or opening the switch connecting S1 to CC, after which the display shows an emergency stop.
| Input terminal 1 selections | F, R, RES, S1 through S5 |
|---|---|
| Example S1 setting | 10: Preset speed switching 1 |
| Output terminal 1 selections | FP, FL, R1, R2 |
A normally closed emergency stop switch or pushbutton must be installed, following the wiring diagram in the note.
Start at the main operation screen, scroll to S1, press the F4 key, then OK, then F2 to reach F114: Terminal S1 function and choose a setting.
The note refers to the AS3 Instruction Manual (E6582062) Section 11.8 Input Terminal Function.
Press the pushbutton or open the switch connecting S1 to CC; if the programming is correct, the display shows an emergency stop.