
This is an assembly guide for the Top Flite® Sea Fury scale cockpit interior kit. The kit includes various parts such as instrument panel, side panels, seat, etc. Some tools and supplies are required for assembly. The kit is designed based on a real Sea Fury cockpit, but modifications may be needed to match specific documentation.
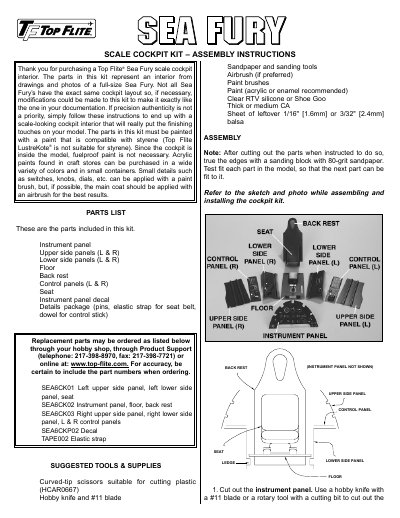
This document provides assembly instructions for the Top Flite SEA6CIP01 scale cockpit interior kit designed for the Sea Fury model aircraft. The kit includes an instrument panel, side panels, floor, back rest, control panels, seat, and various decals and details.
The manual outlines a 15-step process to assemble the cockpit components, including cutting parts from plastic sheets, test fitting, painting with compatible acrylic or enamel paints, applying decals, and installing the pilot figure. It also lists suggested tools and supplies required for the assembly.
The kit requires acrylic or enamel paints that are compatible with styrene, and fuelproof paint is not necessary because the cockpit is inside the model.
You must glue a 1/16" [1.6mm] or 3/32" [2.4mm] balsa sheet to the bottom of the cockpit floor, and a 1/16" [1.6mm] balsa sheet to the back of the back rest.
Use an 80-grit sanding block to true the cut edges, and use 400-grit sandpaper to roughen the parts after washing them.