
Two-page quick reference guide for the VN-541PC voice recorder: power, date and time, recording, playback, PC file transfer, volume, folders and deleting files.
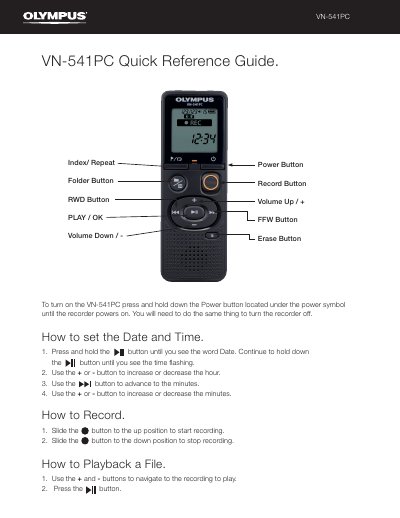
This two-page quick reference guide shows the basic operations of the VN-541PC voice recorder. It names the buttons on the device — Power, Record, Play/OK, Erase, Index/Repeat Folder, RWD, FFW and the plus/minus volume buttons — and gives short numbered steps for each function.
The steps cover turning the recorder on and off, setting the date and time, starting and stopping a recording, playing back and deleting files, transferring files to a computer over the supplied micro USB cable, changing playback speed and volume, and switching between the Talk, Music, LP and Memo folders.
| Computer connection | micro USB cable (provided) |
|---|---|
| Folders | Talk, Music, LP, Memo |
Press and hold the Power button, located under the power symbol, until the recorder powers on. Do the same to turn it off.
Slide the record button to the up position to start recording, and slide it to the down position to stop recording.
Connect the VN-541PC to a compatible computer with the provided micro USB cable, then open Windows Explorer, browse to the recorder, copy the file and paste it to the desired location on the computer.
Use the + or - buttons to navigate to the file, press the Erase button, select yes with the + or - button and press the play button to delete it.