
BioCision ThawSTAR quick start guide covering warm-up, vial insertion, thaw detection, vial removal, and error code solutions.
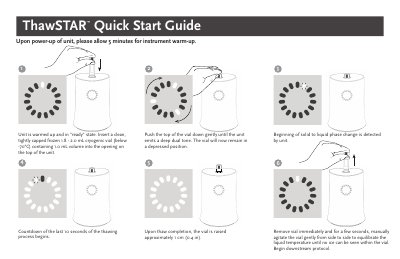
The ThawSTAR Quick Start Guide describes operation of the BioCision ThawSTAR unit. After power-up, allow 5 minutes for warm-up; when the unit is ready, insert a clean, tightly capped frozen 1.8–2.0 mL cryogenic vial below -70°C containing 1.0 mL, push it down until a deep dual tone sounds, and wait for the thaw process. The unit detects the solid-to-liquid phase change, counts down the last 10 seconds, and raises the vial about 1 cm when thawing is complete. Remove the vial immediately and gently agitate it until no ice remains before continuing the downstream protocol.
The guide also provides a ThawSTAR Error Code Guide for codes 2, 3, 5, and 7, with causes and corrective actions. It lists checks for power connections, vial temperature and seating, phase-change detection, vial removal, and contacting BioCision customer service.
| Accepted vial size | 1.8 - 2.0 mL cryogenic vial |
|---|---|
| Sample volume | 1.0 mL |
| Vial temperature | Below -70°C |
| Warm-up time | 5 minutes |
| Vial rise after thaw | Approximately 1 cm (0.4 in) |
| Abandoned vial timeout | More than 15 seconds past thaw completion |
Allow 5 minutes for instrument warm-up after power-up.
It accepts a 1.8–2.0 mL cryogenic vial.
The vial is raised approximately 1 cm; remove it immediately and gently agitate until no ice can be seen.
The unit does not detect phase change; smaller volumes may trigger Error Code 5, so confirm the volume is 1.0 mL.